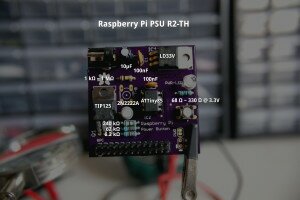
I received my Raspberry Pi PSU Revision 2 PCBs in the mail last week and I got a chance to populate and test them during the weekend.
The R2 board is shared on OSH Park which means you can order your own boards and assemble for yourself.
Components
Here’s the board, fully populated and with all the parts values highlighted.
All parts are fairly common, specially the passives. Here are a few suppliers for the parts you may have a hard time finding.
ATTiny85
SparkFun: COM-09378 Mouser: 556-ATTINY85-20PU
Programming
You will need a way to program the ATTiny, I suggest getting yourself an Atmel AVR mkII, a Pocket AVR Programmer or if you already own an Arduino you can make an ArduinoISP.
LD33V
SparkFun: COM-00526 Mouser: 511-LD1117V33
TIP125
Mouser: 511-TIP125
2N2222A
Mouser: 511-2N2222A Digi-Key: 497-2598-ND
OBSOLITE R3 replaces this component with the 2N3904 and PN2222
Resources
OSH Park: http://oshpark.com/shared_projects/clqtxZaD Video: http://youtu.be/xgsn7Mpjh7g
![Make your own Raspberry Pi – PSU [R2]](/wp-content/uploads/2013/09/wallpaper-8129881.jpg)


Pingback: DIY Raspberry Pi PSU @RaspberryPi #piday #raspberrypi « adafruit industries blog
I’m looking at the schematic and have a thought, would a MOSFET be feasible as replacement fir TIP125 and 2N22222? A 2-3 amp MOSFET in a SOT23 package should decrease the size of the PCB.
/Mats
Author
Hey Mats! I do have an all SMD FET version of this board, it’s not released yet. For this through-hole version though, I went with a TIP125 since it was easier to source locally and I needed a bunch for a workshop I gave.
That makes sense… Thanks for publishing your design. And as I saw another post about lower the power consumption on the Pi by removing the onboard voltage regulator and replace it with a LDO with higher efficiency. But I feel that you are on that track with your undisclosed board.
Kind regards Mats